 |
| Worth a try. There'll be no árm in it! |
I've been forced to take a break from the Leib Hussars for a while due to the belated realisation that I was a couple of castings short. Reinforcements are on the way, but in the meantime I'm cracking on with another unit of Prussian cavalry. I'm hoping that it'll help me get over my cavalry aversion, which lingers on despite having completed three squadrons.
 |
| The implement of triumph or disaster approaches.... |
The unit I've chosen is the Prussian Garde du Corps. There were several reasons for this: it would give me much-needed experience in painting white uniforms; it would brighten up my otherwise sombre-looking horde of Prussian blue meanies; and it would give me another chance to play with the soldering iron. The figures I have for this regiment are 12 x
DK 143: Prussian Guard Cuirassier.
Until a few weeks ago my only experience of soldering was a week's work experience in about 1982. The job was to remove components from old circuit boards. It taught which was the hot end, but not much else.
Having tackled the Swiss musket butt conundrum by simply constructing them out of blobs of solder, the next thing to work out was how to re-attach things that had broken off. I'd absolutely no idea how to do this before I started, so what follows was entirely experimental.
 |
| Just before I became entirely too overconfident! |
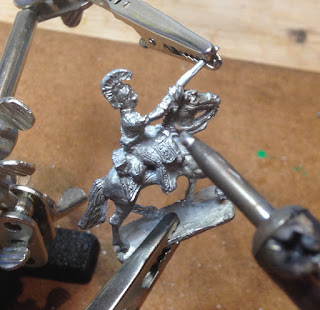
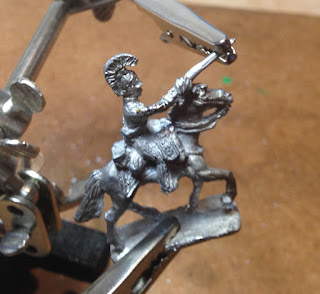
As the pictures show, the problem in this case was how to re-attach a broken arm. There was no obvious way to do this apart for holding it next to the casting, applying heat and solder and then seeing what happened next.
What I thought I would try to do was "paint" a little bit of solder over the join with the tip of the iron, in the hope it would sort of seep into the crack and bind the two parts together. At first this seemed to go rather well. What is not pictured is what happened next, which was the sudden attachment of an enormous blob of solder over the join. This immediately set hard and looked impossible to get off without melting half the figure.
 |
| The patient (on the right) is restored |
The only thing for it was to set to with a craft knife and a file to see if I could could get something at least vaguely resembling the original arm. It took about 15 minutes, but the result, I'm very glad to say, repaid the effort. The new arm even seems to be rather stronger than the original. All my DK guardsmen have been cast with a distinct "nick" in their sword arms which is definitely a bit of a weak spot. If you click-to-embiggen the last photo showing the old and the new side by side you'll see what I mean.
The next thing, of course, was to paint him. He was rather fiddlier to do than the hussars due to his much more complicated fixtures and fittings. The completed regiment, I'm hoping, will look quite fetching.
 |
| I got away with it, but more though luck than judgement! |


Hi Matt - very clever stuff (it looks like a scene out of Frankenstein). You have inspired me to ask Santa for a soldering iron this Christmas!
ReplyDeleteIt Lives!!!!
DeleteCheers, Ian. Be careful mind. A burnt finger was other outcome.
Looks like great work there Matt! Nice rescue of a figure. Are you going to do officer and trumpeter conversions?
ReplyDeleteRoy
Thanks Roy. Dunno.... If I had any spares for the Garde du Corps I'd probably give it a go, but fear I may already have used up my luck with these chaps!
DeleteVery nice ! I'd be too afraid to solder and would drill a hole, put in a piece of wire and super-glue/fill it. What approach did you take for the white- grey undercoat and white highlights or white base with grey lining?
ReplyDeleteThanks Man. That sounds like a much sounder approach! I foolishly thought the soldering was going to be quicker!
DeleteMy white coat painting was also a bit involved: white undercoat, followed by a very thin black enamel wash (black thinned with turps), and then washes of thinnish white enamel on top. The result is a little smearier than I'd hoped, but may improve with practice!
Nice job Matt - that weird torture device in the first picture is scary, but I'm well impressed. I really thought you were going to say that you had decided to add a little solder to each of the sword arms in the unit, to strengthen them. I'm still having therapy sessions prior to doing some solder work on some Spanish cavalry - I am very nervous about it, but these posts of yours are inspirational!
ReplyDeleteThanks for sharing!
Cheers, Tony.
DeleteMake sure that you get lots of practice first on some figures that you really don't care about! It's tricky stuff, and when things begin to happen they do so with lighting speed. I have to mentally prepare myself for disaster every time I try it, as very nearly happened in this case. Hence the decision NOT to have a go at strengthening all the other figures.
Don't do it unless you've got plenty of spares and you're prepared to see something completely written off.
Very impressive, mon brave, you must be a man of hidden talents.
DeleteA bit too hidden, Pierre, which is why its taken me since 1982 to discover I can do this!
Delete